Konfigurasi Open VPN Server Mikrotik Dengan Mikrotik
Tujuan : agar client terhubung secara lokal pada jaringan 192.168.80.0/24
1. Informasi Sistem
-
Router: MikroTik RouterOS
-
VPN Protocol: OpenVPN
-
LAN Server: 192.168.80.0/24
-
Gateway LAN: 192.168.80.1
-
Subnet VPN: 10.10.10.0/24
-
Port OVPN: 1194 (TCP)
2. Pembuatan Sertifikat di MikroTik
2.1 Buat CA (Certificate Authority)
Buka terminal mikrotik:/certificate
add name=ca-template common-name=MyCA key-usage=key-cert-sign,crl-sign
sign ca-template name=MyCA
Cek status Pastikan CA statusnya: trusted=yes/certificate print
Jika belum:/certificate set MyCA trusted=yes
2.2 Buat Sertifikat Server
/certificate
add name=server-template common-name=ovpn-server
sign server-template ca=MyCA name=ovpn-server
/certificate set ovpn-server trusted=yes
2.3 Buat Sertifikat Client
/certificate
add name=client1-template common-name=client1
sign client1-template ca=MyCA name=client1
2.4 Export Sertifikat ke Client
/certificate export-certificate client1 export-passphrase=1234
/certificate export-certificate MyCA
File yang akan muncul di Files:
-
client1.crt
-
client1.key
-
MyCA.crt
Download file tersebut ke PC client.
3. Konfigurasi OVPN Server
3.1 Buat IP Pool
/ip pool
add name=ovpn-pool ranges=10.10.10.10-10.10.10.50
3.2 Buat PPP Profile
/ppp profile

add name=ovpn-profile \

local-address=10.10.10.1 \

remote-address=ovpn-pool \

dns-server=8.8.8.8
3.3 Buat User VPN
/ppp secret

add name=user1 \

password=123456 \

service=ovpn \

profile=ovpn-profile
3.4 Aktifkan OVPN Server
/interface ovpn-server server

set enabled=yes \

port=1194 \

mode=ip \

netmask=24 \

authentication=sha1 \

cipher=aes256 \

certificate=ovpn-server \

require-client-certificate=yes
4. Firewall
4.1 Allow Port OVPN
/ip firewall filter

add chain=input protocol=tcp port=1194 action=accept comment="Allow OVPN"
4.2 NAT Internet
/ip firewall nat

add chain=srcnat out-interface=ether3-WAN action=masquerade
5. Konfigurasi Client Windows
5.1 Install OpenVPN Client
Download pada https://openvpn.net/community/ atau untuk mencari repository lama pada https://build.openvpn.net/downloads/releases/?C=M&O=D
lalu Install OpenVPN GUI.
5.2 Copy File Sertifikat
File:
-
MyCA.crt
-
client1.crt
-
client1.key
untuk dibuat client1.ovpn :
client

dev tun

proto tcp-client

remote 36.67.22.18 1194

route 192.168.80.0 255.255.255.0

resolv-retry infinite

nobind

persist-key

persist-tun
auth SHA1

cipher AES-256-CBC

data-ciphers AES-256-GCM:AES-128-GCM:AES-256-CBC

data-ciphers-fallback AES-256-CBC
remote-cert-tls server

auth-user-pass

auth-nocache
<ca>

sertifikat dalam MyCA.crt

</ca>
<cert>

sertifikat dalam client1.crt

</cert>
<key>

sertifikat dalam client1.key

</key>
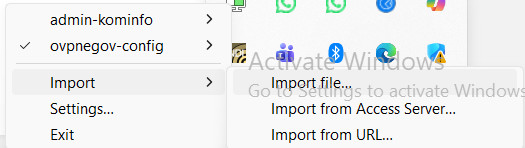
5.3 Import File Sertifikat client1.ovpn pada OpenVPN GUI
6. Connect VPN
-
Jalankan OpenVPN GUI
-
Klik kanan → Connect
-
Masukkan username & password secret PPP
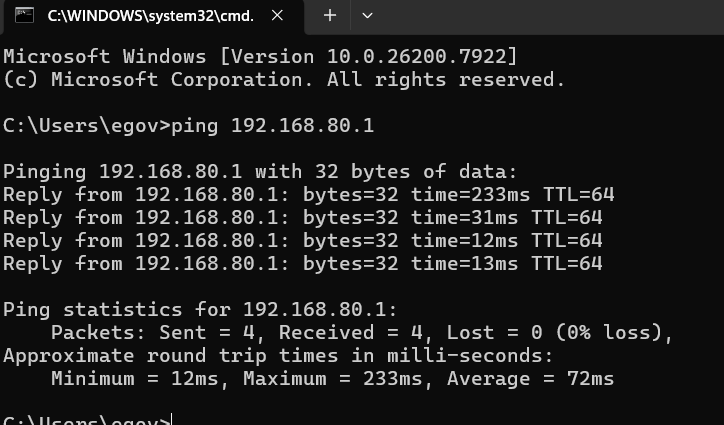
7. Verifikasi
Uji koneksi ke 192.168.80.1